
Blog
How To Grow Mushroom From GrowKits
Magic Mushroom Grow Kit Instructions
Grow the best magic mushroom online from our growkits available at our online shop which helps you on How To Grow Mushroom From GrowKits online.
Grow your very own magic mushrooms in about 2 weeks!
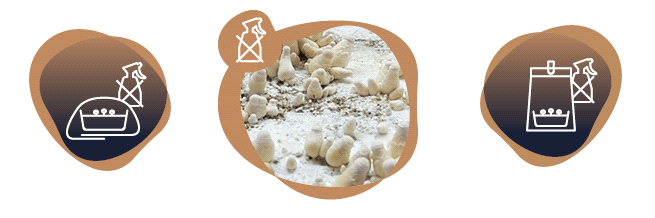
Work hygienically at all times!
- Do not breathe or cough inside the bag.
- Always wash your hands and forearms before you start working on your cultivation (we recommend min. 70% Isopropanol)!
- Put the growkit on a clean place, off the floor (e.g. a shelf)
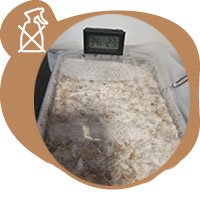
- Check the temperature/humidity with a hygrometer. (optional)
STEP 1: Opening
- Wash your hands and forearms thoroughly to avoid contamination (min. 70% alcohol). Make sure the work environment and surface is clean.
- Optional: place a dark material around the kit but not on the lid to prevent mushrooms growing from the side of your kit. (e.g. duct tape)
- Break of the tab you’ll find on the side of the lid.
- Carefully lift up the lid, and take it off.
- Rinse the lid with water, and keep it clean for later.
STEP 2: Growing
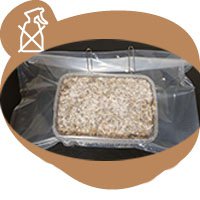
2.1 In the (provided) plastic bag, place the grow kit without the lid. Invert the microperforation on the bag and place the kit inside it as seen in the above image. When using the two clamps keeping the bag in place, ensure sure the bag is shut very tightly. Only the little pores are supposed to allow moisture to escape. Rubber bands can be used to secure the kit if necessary. A clean, elevated surface, like a shelf, should be where you put the equipment.

Points of importance:
- The grow kit is a living product!
- No direct sunlight! The kit only needs a tiny bit of light once and light that is too bright will stress the kit.
- Suitable temperature: 18 – 30 °C Ideal temperature: 23 °C, try to avoid sudden temperature changes, also at night. OPtional: use a thermo-hygrometer.
- Don’t place on or near a heat source, like a radiator. Don’t put it on the floor. Don’t put it next to a window or in a drafty, windy or dusty place.
Heating mat (optional)
- Place the plastic bag with the grow kit in it on the heating mat.
- Switch it on.
After 48 hours switch it off and wait until the buds have developed, which usually takes between five and ten days. - Then switch the heating mat on again and open the top of the bag a little so the moisture can evaporate. Keep it on until the kit is ready for harvest.
- If the buds haven’t developed after ten days, take the mycelium (white matter) out of the plastic box, put it back in the plastic box on its small side and start again at Step 2. Again, turn on the heating mat on for 48 hours and then don’t switch it on again until the buds have developed. Keep it on until the kit is ready for harvest.
2.2 Both misting and spraying water are not required while using the kit. After a day or so, you should be able to see a mist of drops accumulating on the bag’s interior. This shows that the climate, particularly the humidity, is favorable for plant growth. If you cannot see any mist, make sure the kit is tightly contained in the bag and that the surrounding environment is not excessively cold. Small white knots will start to appear on the mycelium (a whitish substance) in the kit after about two weeks. These knots are an excellent indication that your fresh mushrooms are approaching since they will form out of them! Nothing more than a daily check of your kit’s temperature is necessary to ensure optimal growing conditions (see Points of Importance).
2.3 You can start to slowly straighten the sack after you spot the first tiny mushrooms (see photo below). You can increase the amount of room in the bag as your mushrooms grow. As this alters the humidity in the kit and causes the mushrooms to abort (turn grey and die), avoid standing the bag upright to its full extension. Avoid watering or fanning the kit. After roughly 1-2 weeks from now, your first magic mushrooms will be ready.

STEP 3: Harvest
When the margins of the cap’s veil begin to tear a little, it’s time to harvest your mushrooms. The caps are ready to open, which indicates that your mushrooms are at their peak strength. As the mushrooms grow swiftly (1-2 days) in this stage, keep checking! Do not delay; it is preferable to harvest early than late. Beyond the point where the curtain is broken, they won’t get stronger; instead, they’ll just keep gaining water. You’ve probably missed the window if you can see a black dusting (spores). They will begin to lose their effectiveness if you arrive late, but you can still eat them. When the fungus spores, it releases enzymes that could prevent the subsequent flush (see step 4).

3.1 Clean your harvesting area after washing your hands and forearms well (we recommend at least 70% alcohol). Use gloves and a mouth mask if at all possible.
.
3.2 Pick up a mushroom (or cluster) at the mushroom’s base with your fingers and thumb, then gently twist it out. Be careful not to harm the mycelium (white material). Additionally, pushing the mushrooms with your fingers too firmly causes bruising (a blue tint will show). It’s usual to experience some minor bruising, but try to avoid excessive bruising as this reduces the effectiveness.
3.3 Gather every mushroom at once, including the little and gray ones. If any mushrooms appeared at the box’s bottom or sides, carefully remove them with sterile tweezers. If necessary, carefully remove the mycelium from the box (be as sterile as possible). Since unharvested mushrooms could perish and contaminate the kit, be sure to gather all of the mushrooms.
STEP 4: Next Flush!
Take the following steps, then proceed by going back to step 2.
4.1 Fill your grow kit with cold tap water.
4.2 Make sure the mycelium is fully submerged.
4.3 Put the clean lid back on. A little water might spill out, which is fine and indicates that the box is fullymsubmerged.
4.4 Keep the kit in the fridge for 12 hours. This is called a “cold shock”. It stimulates the mycelium to start growing again by simulating the change of seasons.
4.5 After the 12 hours, open one corner of the lid and pour out the excess water.
4.6 Make sure it drains ’till the very last drop.
4.7 Remove the lid, but once again keep it.
4.8 Continue back to step 2.
This process can be repeated several times. Keep trying, sometimes there are up to six flushes!